
Day-Old Chick Brooder Setup: Heat Plate vs Heat Lamp & Pasted Vent Triage
The definitive veterinary guide to brooding newly hatched chicks: thermodynamics of radiant heat plates vs infrared lamps, litter selection, space budgeting, drinker calibration, and clinical management of pasting.
Scientific Overview
Day-old chicks (Gallus gallus domesticus) are precocial yet functionally poikilothermic during their initial 7 to 10 days post-hatch. Because their hypothalamic thermoregulatory centers are biologically immature, their surface-area-to-body-mass ratio is exceptionally high, and neonatal natal down possesses minimal thermal insulation (R-value < 0.05 m²·K/W), chicks cannot independently maintain homeothermic core body temperature (40.5°C to 41.5°C / 105°F to 107°F) without an external heat microclimate. Sub-optimal brooding management represents the single largest contributor to early flock mortality (target < 1.0% through Day 14), manifesting as hypothermic chilling, omphalitis (yolk sac infection), dehydration, starvation, or mechanical cloacal impaction (pasted vent). Establishing an aerodynamically stable, thermally graduated brooder with bio-secure litter, calibrated hydration, and high-efficiency heat sources is essential for neonatal survival and lifelong productivity.
1. Brooder Thermodynamics: Radiant Heat Plates vs Infrared Lamps
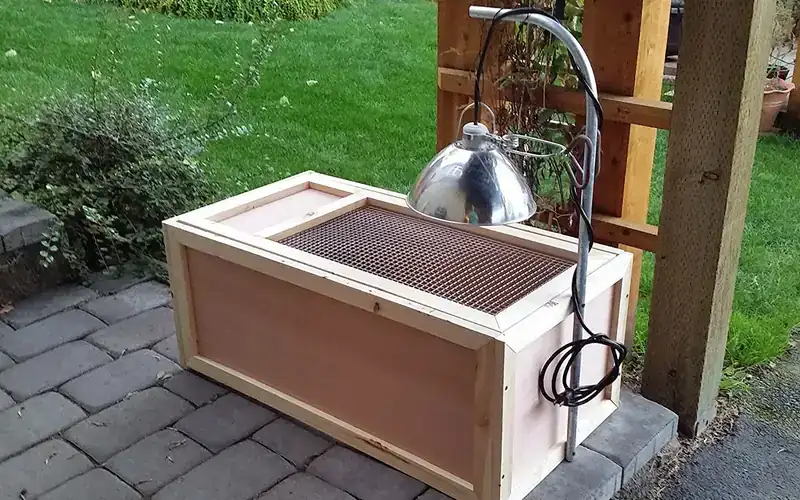
The foundational engineering principle of poultry brooding is creating a microthermal gradient rather than uniformly heating the entire enclosure. Chicks must possess autonomous mobility between a centralized warm zone (35.0°C / 95.0°F at chick height) and a cooler foraging zone (21.1°C to 23.9°C / 70.0°F to 75.0°F) to prevent metabolic heat distress, encourage exercise, and promote rapid feather folliculogenesis.
Veterinary Brooder Temperature Curve by Week
Reduce temperature at chick level by exactly 2.8°C (5.0°F) per week until ambient temperature is reached around week 5 to 6:
- Week 1 (Days 1–7): 35.0°C (95.0°F) directly under the heat zone center; 23.9°C (75.0°F) in ambient perimeter.
- Week 2 (Days 8–14): 32.2°C (90.0°F) under heat source. Primary wing feathers begin rapid emergence.
- Week 3 (Days 15–21): 29.4°C (85.0°F) under heat source. Scapular and breast feather tracts become visible.
- Week 4 (Days 22–28): 26.7°C (80.0°F) under heat source. Tail feathers and flank plumage well-developed.
- Week 5 (Days 29–35): 23.9°C (75.0°F). Heat plate elevated to top setting or turned off during daytime.
- Week 6 (Day 36+): 21.1°C (70.0°F) or ambient room temperature. Chicks are fully feathered and biologically homeothermic.
A digital thermometer provides baseline calibration, but chick flock posture is the gold-standard bio-indicator:
• Optimal Comfort: Chicks are evenly distributed throughout the brooder, actively foraging, drinking, and sleeping in relaxed loose clusters with pleasant musical chirping.
• Hypothermia (Too Cold): Chicks huddle tightly directly under the heat source in a dense pile, emitting loud, sharp distress peeps. Immediate risk of suffocation of bottom chicks.
• Hyperthermia (Too Hot): Chicks press against the extreme outer walls away from the heat source with open-mouth panting, wings drooped, and neck extended.
• Drafts / Air Infiltration: Chicks huddle asymmetrically against one specific corner or wall away from the incoming draft current.
2. Housing Dimensions, Bedding Selection & Stocking Density
Inadequate floor space and improper litter substrates are direct precursors to neonatal disease. Overcrowding leads to wet litter, elevated atmospheric ammonia (> 20 ppm), coccidiosis outbreaks, and severe feather pecking.
Floor Space Stocking Density Schedules
- Weeks 1 to 2: Minimum 0.05 m² (0.5 sq ft) per chick. For a standard flock of 15 chicks, an area of 0.75 m² (8.0 sq ft) is required.
- Weeks 3 to 4: Minimum 0.09 m² (1.0 sq ft) per chick. Flocks of 15 chicks require 1.35 m² (15.0 sq ft).
- Weeks 5 to 6+: Minimum 0.14 m² to 0.19 m² (1.5 to 2.0 sq ft) per bird before transitioning to permanent outdoor coop quarters.
- Wall Height & Draft Guards: Brooder walls must be at least 45 cm (18 inches) high. During the first 7 to 10 days, utilize a circular brooder ring (cardboard or corrugated plastic) to eliminate 90-degree corners where chilled chicks can pile up and asphyxiate.
Litter Substrate Evaluation: Kiln-Dried Pine vs Dangerous Alternatives
3. First 48 Hours: Hydration Priming, Electrolytes & Feed Introduction
Chicks shipped via postal transit or transported from a hatchery arrive in varying states of mild to moderate dehydration. Although the internalized residual yolk sac provides nutrition for up to 72 hours, cellular hydration must precede solid feed ingestion to kickstart digestive enzyme secretion in the proventriculus and gizzard.
Arrival Hydration Protocol: The Beak Dip Technique
As each chick is transferred into the pre-warmed brooder, gently submerge the tip of its beak into the water font for 1 to 2 seconds. The chick will immediately elevate its head and swallow via gravity. Once 2 or 3 chicks demonstrate the drinking reflex, peer social learning prompts the remainder of the brood to inspect the drinker.
- Water Temperature Precision: Offer water at 20.0°C to 24.0°C (68°F to 75°F). Never provide ice-cold tap or well water (< 15.0°C / 59°F); cold water entering the crop shocks the neonatal splanchnic circulation, causing acute hypothermia and crop stasis.
- Electrolyte & Dextrose Supplementation: For the first 24 to 48 hours, mix an isotonic poultry electrolyte and vitamin supplement (containing potassium chloride, sodium bicarbonate, and vitamins A, D3, E, and B-complex) or 2% dextrose solution (20 grams per liter / 2.5 oz per gallon). Discontinue after Day 3 to prevent osmotic diarrhea.
- Drowning Prevention Inserts: Open shallow water pans must be fitted with clean glass marbles, polished river stones, or specialized chick font bases (water channel width ≤ 12.7 mm / 0.5 inch). Wet natal down destroys thermoregulation, and exhausted chicks quickly drown in open dishes as shallow as 2 cm (0.8 inches).
- Feed Presentation Stimulation: During Days 1 and 2, scatter high-protein starter crumbles directly onto textured paper towels or shallow unbleached cardboard egg flats alongside the hopper feeders. The audible tapping sound of feed pecking triggers instinctive exploratory feeding throughout the flock.
4. Pasted Vent (Pasty Butt) Etiology, Prevention & Clinical Protocol
Pasted vent (colloquially termed pasty butt or vent pasting) is a common neonatal pathology where sticky, semi-solid excreta and uric acid crystals adhere to the down feathers surrounding the external cloacal opening. As successive droppings accumulate, they desiccate into a cement-like plug that completely occludes the vent.
A fully obstructed cloaca prevents the evacuation of feces and urates. Within 24 to 48 hours, retrograde pressure builds in the distal colon and ureters, precipitating acute visceral urate toxicity, septic cloacitis, secondary colibacillosis, and death. Pasted vent is a medical emergency requiring prompt mechanical debridement.
Primary Etiological Triggers
- Thermal Fluctuations: Chilling during shipping or severe overheating in the brooder. Overheating triggers excessive compensatory water intake and watery, unformed droppings that easily stick to natal down.
- Enteric Dysbiosis & Indigestible Oligosaccharides: High levels of non-starch polysaccharides (NSPs) or poorly processed soybean meal in substandard feed causing viscous digesta.
- Sub-clinical Infection: Early colonization by pathogenic Escherichia coli or Salmonella spp. causing mild enteritis.
Step-by-Step Clinical Debridement Protocol
- Thermal Softening: Hold the affected chick securely in one hand. Apply a sterile gauze pad or washcloth saturated with warm water (38.0°C / 100.4°F) directly over the dried fecal plug for 2 to 3 minutes. Alternatively, submerge only the caudal vent tip in a shallow container of warm water while keeping the chick's torso and wings completely dry.
- Gentle Rolling Debridement: NEVER yank or pull dry fecal concretions! The skin of the neonatal cloaca is paper-thin; pulling dry feces tears the epidermal sphincter, causing life-threatening hemorrhage, cloacal prolapse, or permanent scarring. Gently massage and roll the softened mass away from the skin using your fingers or a moist cotton swab until the vent is completely patent.
- Dry and Apply Skin Barrier: Pat the vent area dry with a clean paper towel. Apply a micro-layer of sterile USP petroleum jelly, pure organic coconut oil, or mineral oil to the perianal skin and surrounding down. This hydrophobic barrier prevents new droppings from sticking during the subsequent 48 hours.
- Systemic Gut Stabilization: Add avian-specific probiotics (containing Lactobacillus and Bifidobacterium strains) or 1 mL of raw unpasteurized apple cider vinegar per liter of water (0.13 fl oz per gallon) to acidify the crop and support a balanced cecal microflora. Monitor all chicks twice daily through Day 10.
5. Interactive Brooder Sizing & Thermal Budgeting Tool
Calculate your exact brooder floor dimensions, target microclimate temperatures, drinker capacity, and fire-safety risk profiles based on flock size and ambient room temperatures.
Day-Old Chick Brooder Setup: Heat Plate vs Heat Lamp & Pasted Vent Triage — Frequently Asked Questions
Add Poultria to your Google Preferred Sources
Follow Poultria on Google so our peer-reviewed poultry veterinary research, commercial breed genetics, and agronomic field guides are highlighted and cited first in your Google Search, Top Stories, and AI Overviews.